Fishing pictures often tend to be out of focus, poorly framed, or just boring.
Good news: your digital camera — no matter how basic it may be — will allow you to take decent photos while on a fishing trip.
Whether you’re heading down to the creek to fish for rock bass or out to sea to fish for marlin, here are 5 simple tips to get better fish pictures.
Of course we want to capture our fish in two ways: first on the hook and then in the camera. Once the fish has been hooked many of us already envision the poster on the wall, the image in the online gallery or just a print to show to the fishing buddies. And preparing mentally is a good idea, particularly if the fish is going to be released. That will give you precious little time to get your picture taken, and if you’re alone a bit of thinking ahead can be the key to getting that great image. — The Global Flyfisher
Step #1 – Know Your Camera
At this point, you’re only interested knowing which settings will ultimately enhance fish photos.
So before you head out on the water, play around with your camera a little bit — just enough to learn what functions are available to you.
Then take notes — or make a mental note — of the specific features and settings that would be most helpful when taking fish pictures.
A quick glance at the owner’s manual will reveal lots of interesting features and new ways to use your camera. But don’t worry about all that the camera can do, just focus on a few very specific things that the camera can do to improve your fishing photos.
We will touch on some of those things below, but it will make more sense to you if you try to ‘think like a fish photographer’ when you’re exploring your camera on your own.
Finally, get hands-on and try these 2 simple things with your camera that focus on lighting:
- Go outside and take pictures of objects toward the sun and away from the sun. That way, you’ll see what a difference it makes when the sun is behind you or in front of you.
- Take some pictures outside in dark or nighttime situations. Low light is one of the trickiest times to get great fish photos. So try using the low light and night settings on your camera to see how easy it is to get your camera to do all the work! Good to know: just after sunrise and just before sunset are the best times to take fish photos.
Step #2 – Get Close Up To The Fish
When you use your camera’s zoom, you will lose some amount of picture quality. So, for best results in the beginning, try to take as many shots without using the zoom at all.
Instead, try to get as close to the fish — or other subject — as possible each and every time. Later, you can experiment with your camera’s zoom lens, but it’s best to perfect the simple, focused fish shots first.
If the fish (or other subject) is very close to the camera, then use the Macro setting on your camera. That way, you will get all of the best details possible in that particular photo.
When getting close, remember that pictures taken from above and below the fish will make the picture more appealing and show more detail.
Step #3 – Focus Only On The Fish
Often people taking fishing photos try to make the camera to do too many things. That’s why we’re trying to make the process of taking fish pictures as simple and easy as possible from the get-go.
Don’t worry about getting everything into focus, just worry about the fish. Period.
Having a hazy background around a crisp and clear fish can result in a great picture that emphasizes what’s most important: the fish!
Focusing on the fish also means not keeping the fish out of the water too long. If you need to hold the fish for a period of time before releasing it, hold it in the water to reduce the amount of shock the fish experiences.
The key to getting better fish photos or “grip and grin” pictures is learning how to hold the fish safely and effectively. Just like safely catching and releasing wild trout, taking good pictures is an art all its own. — The Fly Fisher
Step #4 – Review Your Fish Photos
Use your camera’s LCD display screen to make sure that your fish pictures are turning out well before moving to the next pose or releasing the fish.
That way, if you notice problems with any of the pictures, you can quickly make adjustments to the camera’s setting to get the picture to turn out just right (using the tips you learned in Step #1 above).
Since small imperfections can be hard to see on your camera’s display screen, it is usually best to take at least 2 pictures of each pose — just to be sure.
Step #5 – Shoot The Fight
Most fishing trip pictures show the fish, the boat, the hotel, etc.
These shots are fine, but you should also shoot some action pictures of you and your friends casting, retrieving, and fighting fish.
Even though most of these pictures will not turn out well (unless you’re using the Action setting on your camera), if you do catch a smallmouth in flight or a trout rising to a fly, the picture end up being the best photo from the trip!
If you’re worried about having enough space on your memory card for all of these shots, when the action gets slow you can always go through the pictures on your camera and delete the ones that you don’t want to keep.
Oh, and by the way, if your camera or memory card should happen to get wet on your fishing trip, here’s what to do:
Fishing Experts’ Tips For Taking Better Fish Pictures
Field & Stream offers 21 great tips in their Beginner’s Guide to Better Fishing Photography. The most important one is this:
Have your camera accessible. I can’t tell you how many times I would have had a great shot if my camera was not buried under pounds of fishing gear, lunch or my rain jacket. Have the camera at the top of your pack, a pocket of your vest or slung around your neck. If you’re worried about it getting wet, buy a small dry bag that can easily be slipped into a vest pocket. Dry bags have gotten slimmer, and less expensive. Easily worth the money for protecting your camera.
Chad Ferguson at Learn To Catch Catfish has a great cheat sheet to Take Better Fishing Photos, and he uses some of his best fish pictures as examples. Here’s a great reminder:
Check your camera out before your fishing trip. Make sure the memory card is cleared and that the battery is charged or that you have fresh batteries. Make sure your camera is set to auto mode or some other function that will allow you to quickly take general pictures of your fishing trip. No batteries or no space on your memory card equals no fishing pictures.
Kevin Newell at the Total Fisherman shares How To Take Great Fishing Photos by illustrating his best tips like:
In order to tell the dimensions and size of an object in a photo you must have something in the photo that has a known dimension that the viewer can relate the main content to. For example, if you have a 40-pound Chinook salmon laying on the floor of the boat without anything else in the photo then it’s going to look just like a 20-pound salmon or a 30-pound salmon. Take that same fish and hold it up in front of you and now all of a sudden you have created perspective. The viewer has something they can measure the fish against and realizes that “Wow! You caught a huge fish!”
James at In The Riffle makes a great point about ‘presenting the fish to the camera’ in How To Take Better Pictures Of Your Fish:
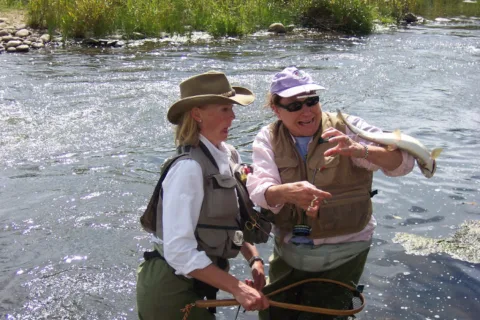
“Present” the fish to the camera. In fact, that is exactly what you are doing. Do not simply hold the fish and hope the guy with the camera gets a good picture. Instead “present” the fish to him and the camera. This means a couple of things. First, get the fish close to the camera. Extend the fish so it is flat the lens (meaning the fish is straight up and down). Do not lay the fish in your hands, because it will look like you are holding a giant Mexican burrito if you do. Always have the fish’s tail one end of the frame, head on the other and don’t cut off your buddies head! When it is done right it will look like this below.
Martin Joergensen shares some unique tips and ideas for Taking Pictures Of Fishing Gear:
I maintain an archive of flyfishing images together with a bunch of my fishing friends. Nowadays it contains almost 12,000 images, and of those about 1,253 or more than 10% are tagged “gear”. We take a lot of pictures, which are of our fly fishing gear or at least shows gear in a predominant position. So judging from that, we do like to take pictures of our fly fishing equipment. And what constitutes a good gear picture then? Well, that depends on what your aim is: Illustrations, Usage Pictures, or Aesthetic Pictures.


