This make-it-yourself fly rod rack is very simple, very effective, and very inexpensive.
Check it out!
Here’s how to make it yourself…

I was out on the back deck, stringing up a new rod for a client when I heard that familiar sound of a fly rod sliding down the wall that it had been leaned up against.
I turned around just in time to see it fall to the ground as the cringing owner was making a lunge for it. Too late.
Didn’t appear to hurt the rod any this time, but if it had fallen on the edge of a rock or caught the corner of a window frame, it could easily have been damaged to the point of needing repair before using again.
I once saw a graphite rod slide down a wall like that and then get stepped on by its owner as he was trying to catch it during the fall. I decided I needed to come up with some kind of a rod rack that would keep assembled flyrods out of harm’s way out on the back deck.
I know there are a huge number of fishing rod racks available out there but I couldn’t find one to suit me.
I didn’t want a free-standing rack because that would take up too much room on the deck. I didn’t have a good place for a wall-mounted rack; too many windows and doors. I started looking at the deck rail.
Yeah, I needed something that I could put on the rail — out of the way — that would keep the rods standing up. Several ideas came and went before I settled on a concept. I could use the deck railing to hold the reel end of each rod, but still needed something to put the tips into up higher.
Supplies Needed To Make A Fly Rock Rack
 I was in the basement, looking around for something to use to make some kind of hoops or loops to insert the tips of fly rods into when I saw it, pipe insulation.
That foam tube stuff. I had some left over from pipe insulating project. Perfect.
You’ve probably seen it around your own home or at the hardware store. This particular type is black, about 6 feet long with a slit running the entire length of the insulation.
You’ll also need :
- A utility knife
- Hammer
- Stepladder
- Plumb bob
- Roofing nails (I used roofing nails because they have a large head.)
How To Make Your Own Fly Rod Rack
I used the 1-inch inside diameter insulation for this project, simply because I had some. I think it turned out to be just the right size.
I cut the insulation into 6-inch lengths with a utility knife. The only reason I chose that length is that I wanted my rod rack to be able to hold 10 rods and I had 60 inches of insulation. In hindsight, it’s obvious that 1-inch sections would have worked too but would have been harder to nail up to the rafter support beam. Three inches is probably just right.
Then I used a plumb bob to help me locate the mounting position on the rafter support beam.
I don’t actually own a plumb bob, so I made one using some fishing line and a nail. I wanted each tube of insulation nailed directly over the space between the deck rail spindles that would hold the reel of each rod. I nailed each short tube of insulation up, holding them open in the pre-cut split to place the nails.
Here’s a photo of the insulation pieces nailed to the rafter support beam:

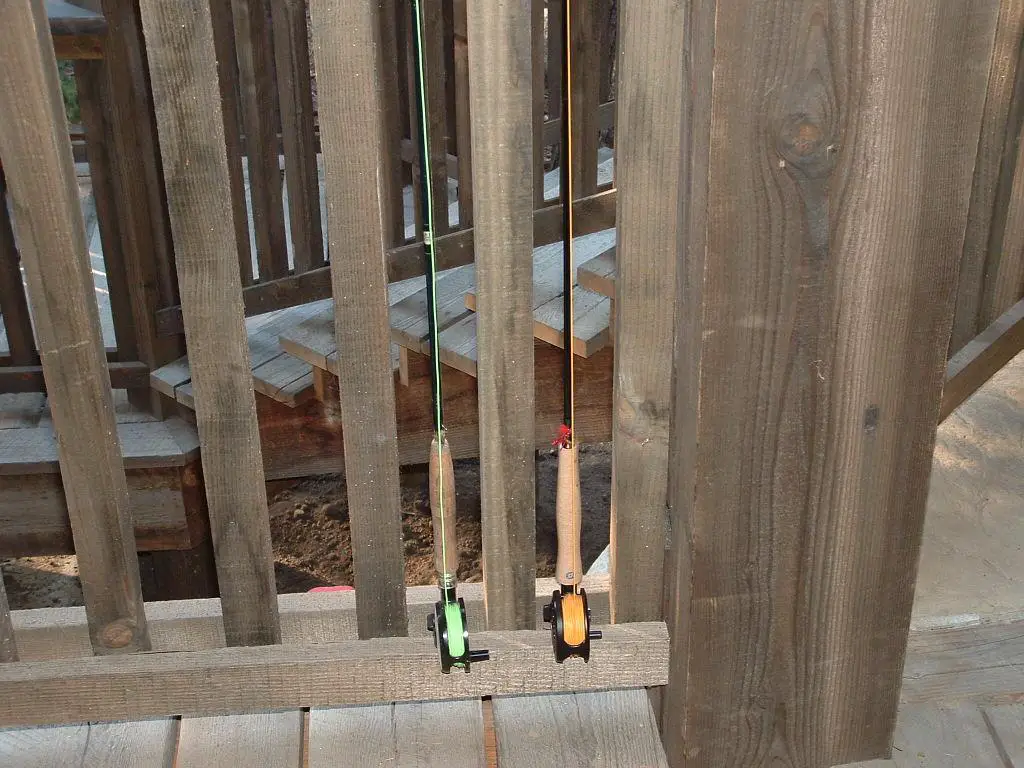
Slip the rod tip up into the insulation tube and rest the reel on the deck rail between the spindles. It works great, doesn’t take up any room on the deck floor, and should last a long time.
I tried to draw a side view sketch of the concept on the computer. Michelangelo I’m not. Here it is:

Total cost? Less than $5 and it really does work perfectly!
Next time, I’ll show you a DIY fly rod tube that my mother made.
Sharp hooks and tight lines,
Ron
I’m a fly fishing guide in Montana. One of my greatest pleasures in life is introducing people to fly fishing — watching them catch their first fish on a fly, and watching them ‘get it’ when it all comes together. I love sharing what I’ve learned in an easy-to-understand manner.